Showing posts with label craft. Show all posts

Monday, December 19, 2011

Peg Dolls

Another idea that I found on Pinterest for a homemade Christmas gift for my boys were these adorable peg dolls!  There were Harry Potter ones for the 9 year old, Super Hero's for the 3 year old, and I searched out these Super Mario ones for the 5 year old.

There were no tutorials for these designs, although if you Google "peg dolls" you can find basic tutorials for tons of other ones, and it was through one of those sites that I found the website to order the wooden peg people.  You can also find them at craft stores sometimes, although the Joann's in my area only had the dress shaped ones.  I bought the 2 3/8" tall ones from the linked business.  They were only .25 each, the most costly thing was shipping which was around $6 but, still, under $10 for gifts for all three boys ain't too shabby!


It took me about 4-5 hours total to finish all 12 of these people.  I just pulled up the pictures of the designs I wanted to do and did my best to get it at least close.  I'm no artist, that's for sure.


I haven't been able to give reviews on how my kids have liked everything I've tried, like the Harry Potter wands, as they're for Christmas gifts but I can give at least a tiny review on these guys.  The 3 year old has seen my pinned pictures of the peg dolls and every time he sees the super hero ones, he shouts "I want those Mommy!"  Well, after I finished painting the dolls yesterday, I had put them on a dresser in my closet to finish drying completely and forgot they were there.  He was with me while I was putting away laundry this morning and, all of the sudden, his eyes got big and he exclaimed "Mommy!  It's those things I want!"  Oops.  I quickly ushered him out of the closet, closed the door and tried my best to distract him but he was none too happy.  Once I got him settled doing something else, I went back and hid the dolls.  He hadn't forgotten them, though, and a bit later came to me saying, "Those guys are missing!  I can't find the Batman and Robin, they're gone!"  I'm currently trying to convince him it was just his imagination and he never saw anything.  So far, he's not buying it.  But I'm guessing these will be a hit when he opens them on Christmas Eve!


Monday, December 12, 2011

Measurement Christmas Trees

Today we made Measurement Christmas Trees for a school/craft activity. The original idea was on a Kindergarten blog and entailed having the kids order the green strips from largest to smallest. That was a perfect activity for the 3 year old, with a little help from me. I'd put two strips out and ask him "Which one is bigger?", let him choose, and help him glue them on.


The smallest to largest part was way easy for the 5 and 9 year olds so I took it a step beyond and had them actually measure their strips and write how many inches each one was on said strip. This was great measuring practice for the 5 year old and we also talked a bit about fractions when a measurement would come up as 1/2 or 1/4. It was nice reinforcement for the 9 year old, who has been studying fractions, as well.


Once that was done, the kids got to paint snowflakes on using Q-tips. They all had a lot of fun "dot, dot, dotting" their projects.


This was a fun and educational project, perfect for preschool through kindergarten, and even beyond!
(The 9 year old asked me to specify that his tree is the one on the far right.) : )

Wednesday, December 7, 2011

Harry Potter Wands AKA Those Stupid Bleepity Bleeps

Warning! This post may be considered PG13 for language!


Okay, so I'm not big on swearing. I don't do it very often and I don't really care to hear it. But some things will drive me to say some colorful words and these Harry Potter wands were one of those things.

When I saw these on Pinterest, I knew I had to try them for my major Harry Potter fan children. We're doing a lot of homemade this Christmas and I thought this would be a perfect gift for all 4 of my kids. So tonight, while the hubby was putting the little ones to bed, I got out my hot glue gun and went to work.

Ooooh, boy. It didn't begin well. I couldn't get the glue to go much farther than an inch down the wand no matter what I did. In reading the comments on the original blog post, someone said they had a similar problem and solved it by rolling a pencil in the wand. I tried that. No go. After starting on my third attempt, and going on an hour of working on these, I was getting frustrated, and yes, some naughty words were sneaking out. I really didn't want to give up, though, as I knew my kids would just love the finished product. So out of desperation, I unrolled all of the third wand, up to where it was filled (about 1 inch of the bottom) and got the glue gun close to the dried glue and starting squeezing the heck out of that gun while whisper yelling "Fill dammit! Fill!" Huh! It was seeming to work!


That was the key, getting that first inch filled, letting it cool and harden, and then unrolling and filling and rolling as I went. I was happy I figured out a solution, but it still wasn't smooth sailing. For one, that glue it hot!! Even through a layer or two of paper, it can burn you. Trust me, I know. (and one or two small bad words may have escaped every time I touched that scalding paper) Two, anyone who's worked with hot glue knows of those hot glue strings you get. Mid-way through the first wand, I felt like I was covered in hundreds of spider webs-blech (of course, I wouldn't possibly think of uttering any more no-no's while trying to shake millions of little glue strands off of my hands, arms, clothes...). It also got a bit tedious filling, waiting for it to cool a bit, filling, waiting, filling, waiting, filling, waiting, and so on and and on. After I got that first one filled, the others went more quickly. That could also be because I had my husband helping to hold at that point so I'd fill, he'd hold while it cooled while I started filling a second one, we'd trade and we pretty much had a good system going on. He was also very helpful in suggesting I "stop burning myself" each time a damn or sh*t escaped my mouth.

Each wand took 10-13 mini glue sticks to fill and about 20-25 minutes. After my first couple of failed attempts, I also realized I was rolling the wands too loose. They should be fairly tight, with the narrow end about the size of a pencil, getting a bit wider at the other end.
That greeny yellow thing is an unsharpened pencil if you couldn't tell.


Here's how a finished, filled wand looks before painting;


The painting and making the designs when fairly quickly and I just did that as the directions on the original blog say.
I started this project around 9:00pm and, at 2:00am, I was finally finished! Well, not quite. I still need to Modge Podge them today but come on, it was 2am, I was calling it a night.
I have a love/hate relationship with this project. It was a major pain in the hiney to fill these babies, I burned more than one of my fingers, I got sick and high (in a bad way) from smelling all of those darn heated glue sticks, and it kept me up half the night. That being said, the final result is so stinking COOL! I think my kids are going to flip over these! I went from cursing them all to H-E-double-hockey-sticks in the beginning of the night, to practically kissing them and whispering sweet nothings to them in the wee hours of the morning.

So I'd say give the project a try, as long as you go into it prepared. You could do so many cool things, fairy wands with pearlescent pastel paint would be so pretty! They're very sturdy, and surprisingly heavy, once finished so they should hold up to quite a lot of play.

Now excuse me while I go ice my finger pads and take a nap.

**Edit to add: I think I may have been a little too complainy in my post. While these were a pain in the butt to fill, the end result was totally worth it! The decorating was pretty fun too so if you're considering trying this one out go for it! Just have a stiff drink on hand to help get through the first part. ; )

Tuesday, December 6, 2011

Lace a Paper Plate Snowman

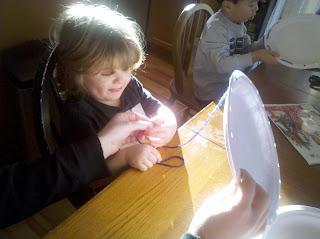
The craft I chose for today was to lace a paper plate snowman . I started out intending to do this one just as the directions stated but my hole punch had different plans. The spring on it was broken so I would have to pry it open after each and every punch and, well, after doing 4 plates, I just wasn't into doing 4 more so I modified the project.

We turned our lacing plates into frames for cotton ball snowmen. Each kid got a plate and some yarn and laced the edges. The two 3 year olds (our neighbor boy was over too) liked doing the lacing but needed help or they'd get mixed up. They did enjoy saying "Up....down....up....down...." while trying to keep with the pattern though.
(See his little tongue sticking out while he concentrates?? Too cute!!)

The 5 year old did better independently, but his ended up being laced around the edges which he deemed "better" so he kept them that way.

After the plates were all laced up, we added cotton ball snowmen. The 20 year old, who loves all things craft, decided to join in at this point and got super creative with pipe cleaner scarves, hats and trees and tooth pick arms. The toddlers enjoyed picking out what to add to their snowmen (my 3 year old insisted on a "Santa hat!") and the 5 and 9 year old really got into making their scene complete.
Not sure if we'll do this project again next year, but all in all, a fun way to spend some time this afternoon.